
How To Make A Home Skate Ramp – The Ultimate Guide
Table of Contents
Key Highlights
- Building a home skate ramp is an achievable DIY project that can be tailored to your skill level and available space.
- Having a home skate ramp allows for convenient practice and skill development, especially for beginners.
- Carefully planning the design and dimensions is crucial for a safe and enjoyable skating experience.
- Using durable materials such as plywood and ensuring proper construction techniques will make it strong and long-lasting.
- Regular maintenance like tightening screws and repairing any damage will help extend the life of your home skate ramp.
Introduction
For skateboarders, especially beginners, having this at home is very convenient. It gives you the freedom to practice whenever you want. This easy guide will explain how to build one. This DIY project is rewarding and fun. Whether you are experienced or just starting, building a home skate ramp lets you create a design just for you. It also provides a safe place to improve your skills.
Essential Materials and Tools
Before starting the construction process, it’s important to collect all the needed materials and tools. This will help create a smooth and effective workflow. Below, you will find the main items needed to build a home skate ramp as a quarter pipe. This way, you’ll have everything ready to go.
Having the right tools is just as important as having the materials. The list below shows the tools required for cutting, assembling, and securing your skate ramp. This will help you succeed in the construction phase.
List of Materials Required for a home skate ramp
Choosing strong materials is important to make it last a long time and to keep it safe. Plywood is a good option because it’s strong, flexible, and easy to find. Here’s a list of materials needed to build a quarter pipe or halfpipe:
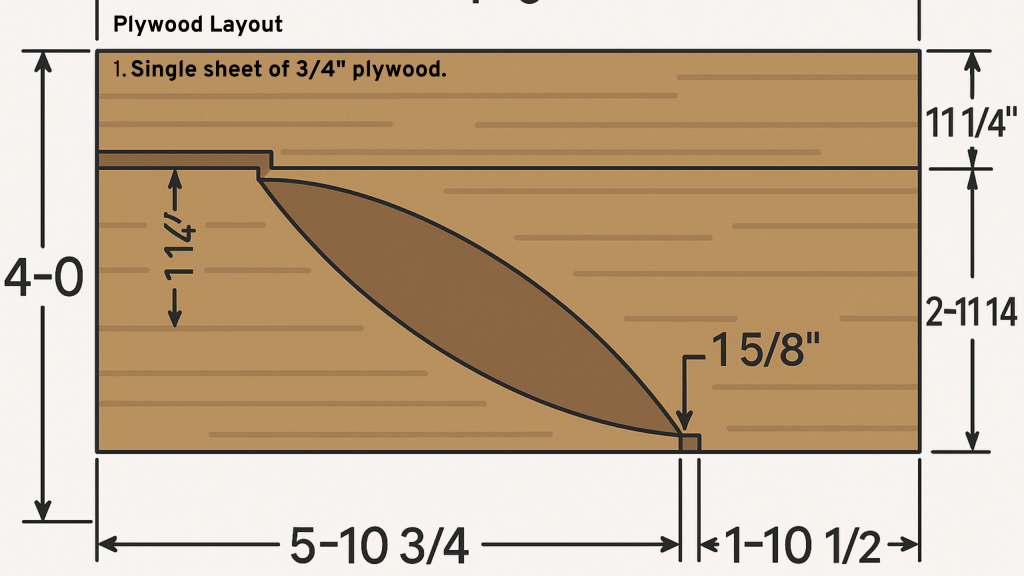
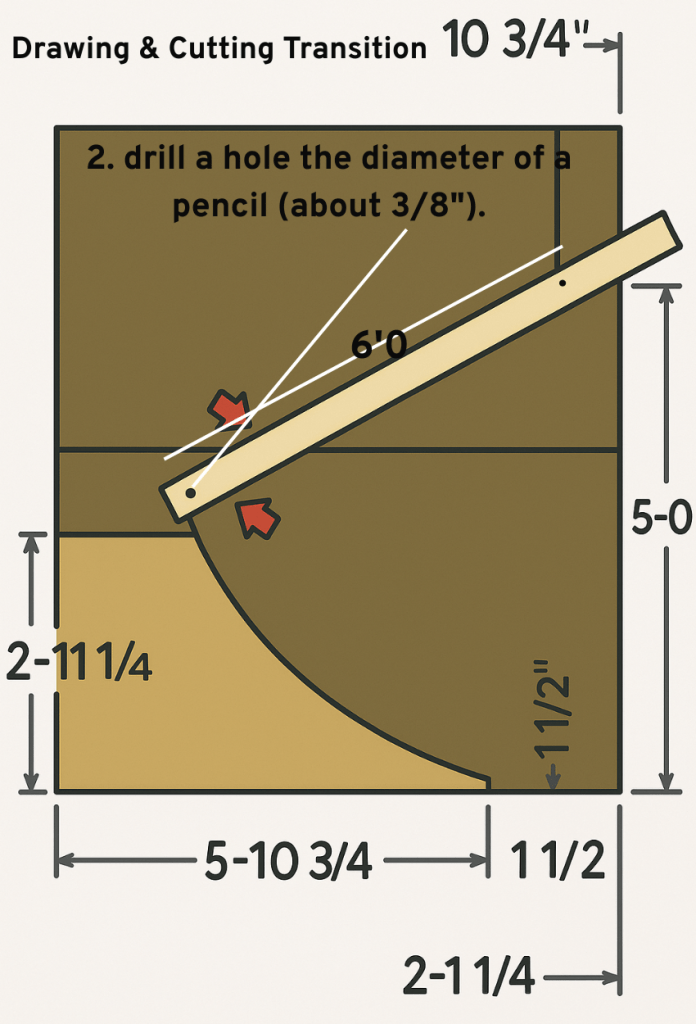
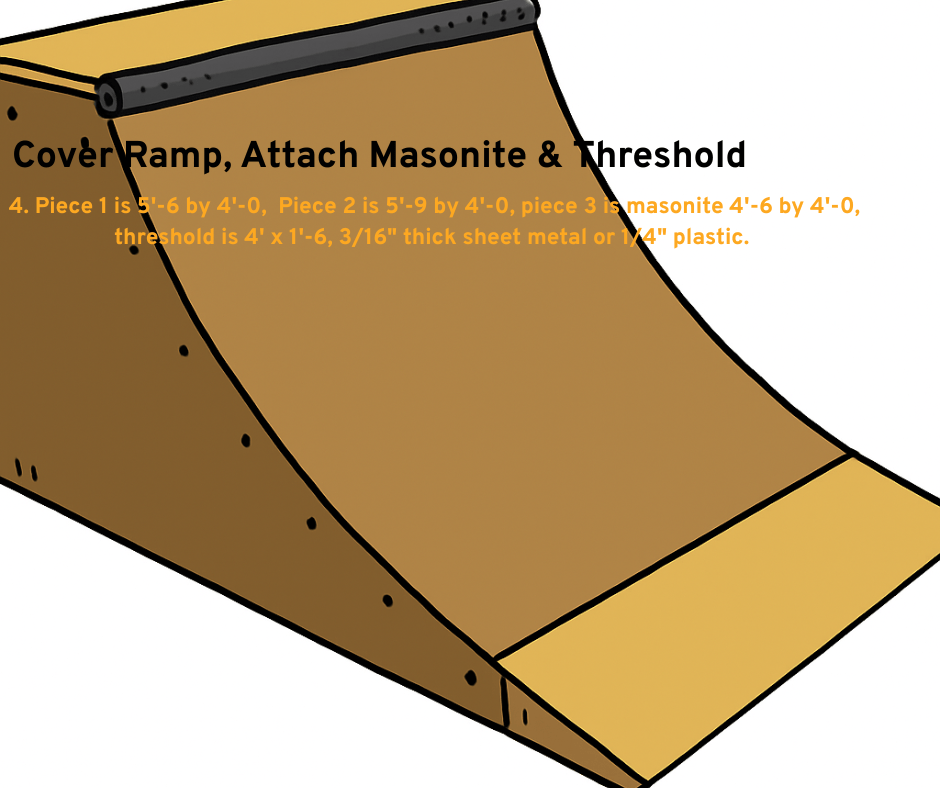
- Plywood: Choose exterior-grade plywood in different thicknesses for the ramp surface, transitions, and support parts. Cut 2 pieces of 3/4″ plywood for the transition parts. Cut 2 pieces of 3/4″ ply at 11 1/4″ by 4′ for the deck of ramp. Cut 1 piece of 3/4″ ply at 5′ 6″ by 4′ for ramp surface and finally another 3/4″ ply at 5′ 9″ for second layer of ramp surface.
- 2×4 Lumber: This is used to shape the ramp and give it support. Get 8 foot long 2 x 4 and cut 13 pieces to a length of 3 foot 10 1/2 inches for ramp framing.
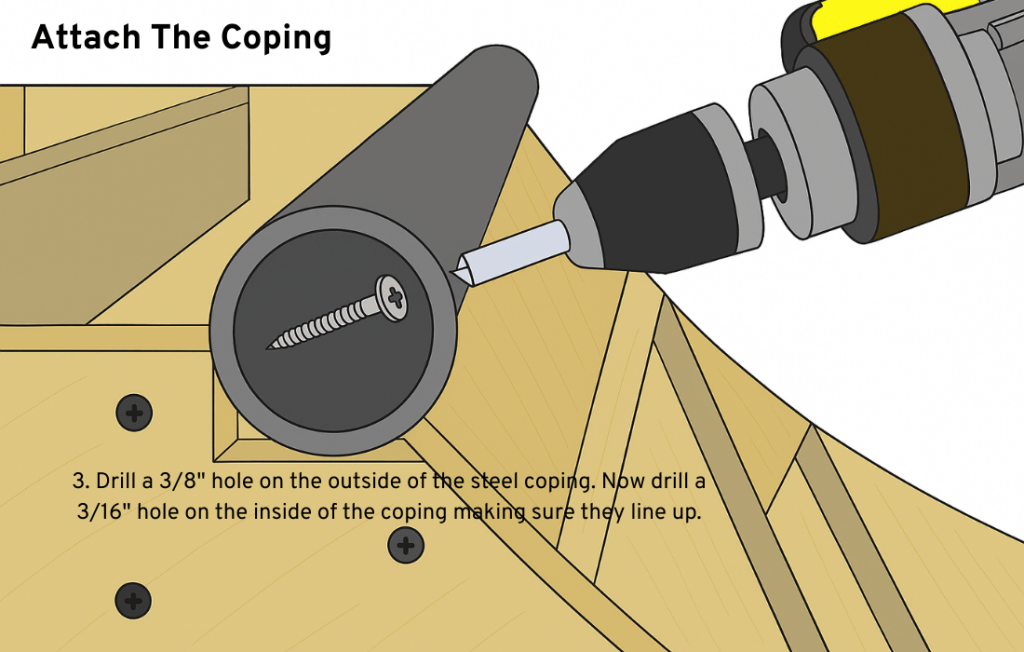
- Steel Coping: A metal pipe, usually made of steel, is needed for the edge of the ramp. This helps with grinds and tricks. Get 1 4′ steel pipe at 2 3’8″ diameter with a wall thickness 1/4″.
- Fasteners: Use exterior-grade screws and bolts to hold everything together firmly.
- Concrete Footings: These create a steady base for the ramp, which is very important for outdoor ramps. Optional for half pipe.
The amounts of materials you need will depend on how big and what design you choose. It’s a good idea to get a little more than you think you’ll need. This way, you can fix any mistakes or make adjustments while building.
Necessary Tools for Skateboard Ramp Construction
Having the right tools is very important for building successfully. Here are the must-have tools you will need:
- Saw: You will need a circular saw or jigsaw to cut plywood and lumber to the right size.
- Drill: A drill with different drill bits is important for making pilot holes and putting in screws.
- Measuring Tape: Accurate measurements are very important during the building process. A good measuring tape is essential.
- Level: To make sure the ramp’s surfaces are level and steady, a level is necessary for getting good results.
- Screwdriver: A screwdriver or impact driver can help you drive screws quickly.
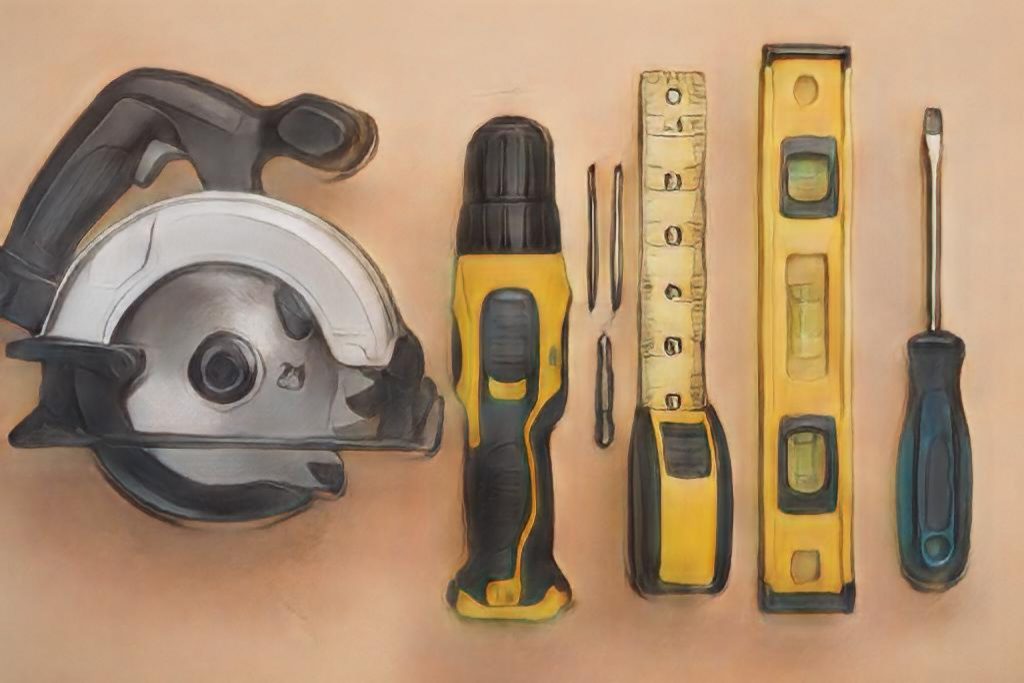
Using strong and reliable tools will make your building process easier and give you a smoother final product. You should also use safety gear like safety glasses and gloves.
Designing the Blueprint – For Your Own Skatepark
Now that you have your materials and tools, let’s talk about design. Before you begin building, it’s a good idea to create a blueprint or sketch of your skate ramp. This visual guide will help you as you build.
You can draw your sketch on paper or use design software. Make sure to show the sizes, angles, and where all parts will go. This planning step will save you time and avoid problems later on.
Drafting Designs for a Quarter Pipe
A quarter pipe has only one incline to go up and down on. When making a quarter pipe, you should think about three main things: height, width, and the curve radius.
You can choose the height and width based on your skills and where you can build it. Beginners may want a shorter ramp. In contrast, more advanced skaters might like a taller and harder ramp.
The curve’s radius changes how steep the ramp is. A bigger radius makes the curve smooth and gradual. On the other hand, a smaller radius makes the ramp steeper.
Creating Plans for a Skaters Halfpipe
A half pipe is made of two quarter pipes joined by a flat area. This setup lets skaters move back and forth easily on the half pipe. When you plan a halfpipe, you should think about the same things as with a quarter pipe. You also need to consider the length of the flat section, known as the “deck.”
The deck’s size affects how much space your halfpipe will take up. Make sure you have enough room for the length you want.
You can also add extra features like extensions or platforms to make your skate ramp more challenging and interesting. Don’t forget to clearly mark all sizes and parts on your design plan.
Step-by-Step Building Process
Now that you have your blueprint, it’s time to begin building. This phase is about turning your design into a real home skate ramp. This section will help you with the process, step by step.
Each step builds on the last one, so be sure to follow them in order. Don’t forget to check your blueprint often to make sure everything is correct.
Constructing the Base and Frame
Start by building the base of your skate ramp with concrete footings. Make sure the footings are flat and placed according to your plan.
After that, take 2×4 lumber to create the frame for your quarter pipes or halfpipe. Cut the lumber to the right size based on your measurements.
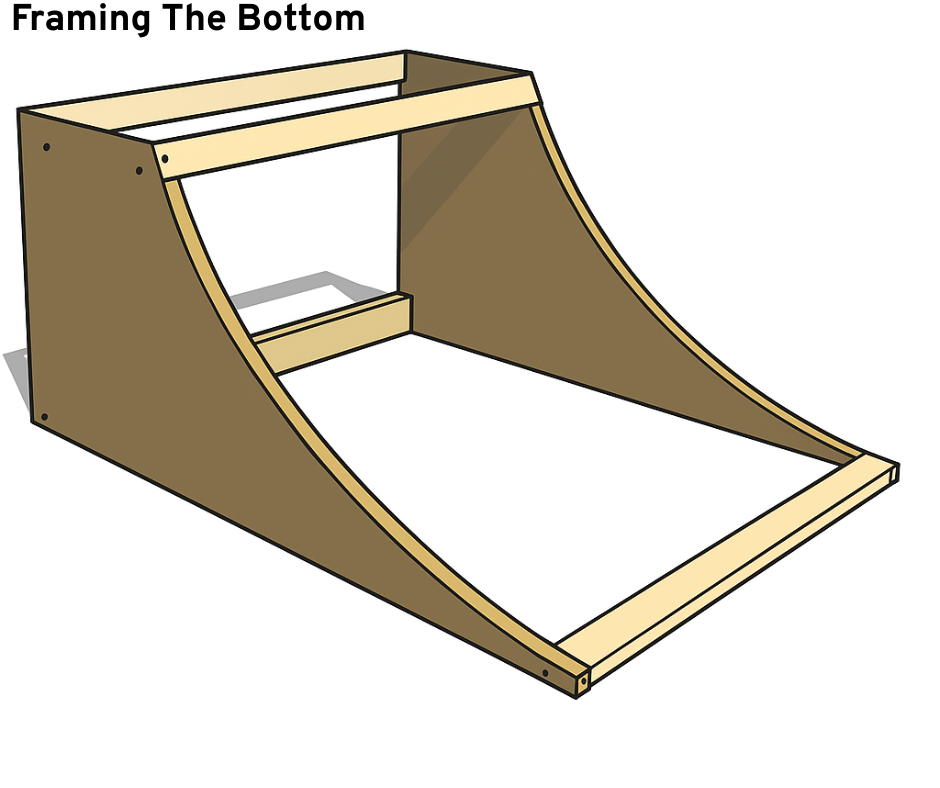

It’s very important to make sure the frame is strong. It should handle the impact of skating. Use a level while you work to keep everything straight and safe.
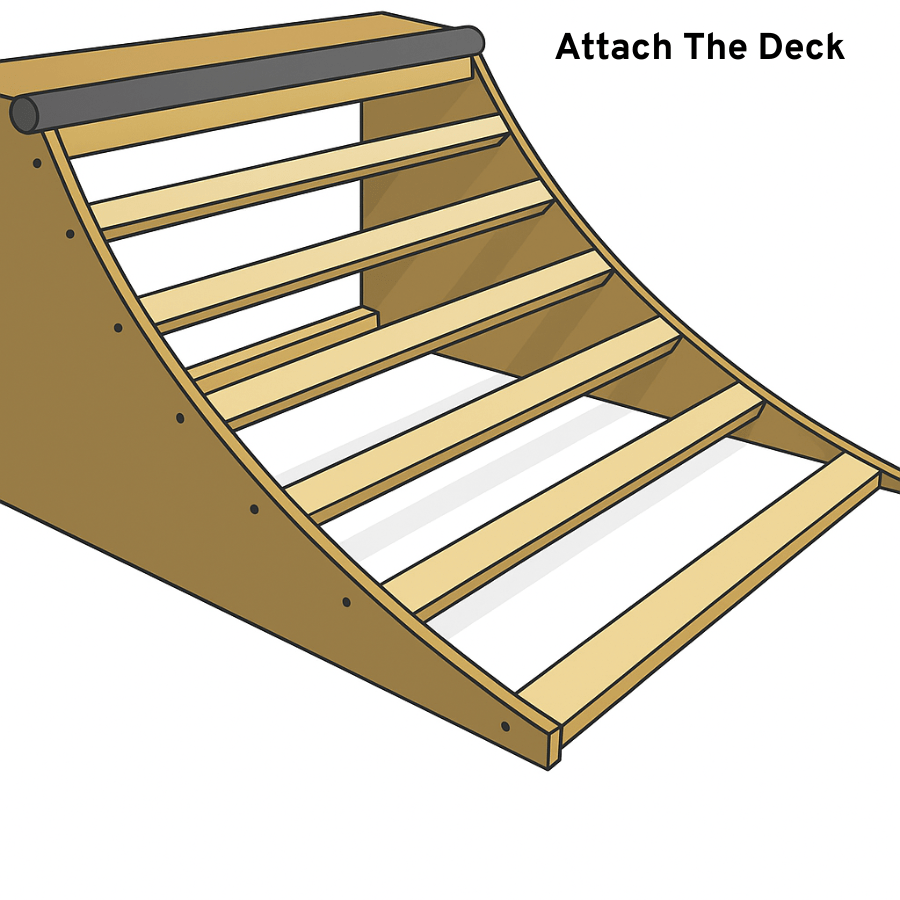
Adding Surfaces and Coping
Once the frame is done, you can add the surfaces. Use plywood sheets to cover the ramp’s curved parts and flat areas. Secure these with screws.
Next, put the steel coping along the top edge of the ramp’s transitions. Secure the coping by drilling holes and attaching it to the frame.
All Images inspired by DIY Skate
A smooth and strong riding surface is important for a safe and fun skating experience. Think about sanding any rough edges and using a sealant to keep the wood safe from moisture.
Conclusion
Building a home skate ramp is a fun project for anyone who loves skating. With the step-by-step guide in this text, you can make your own skate area in your backyard. Always keep safety in mind! Taking care of your home skate ramp and making small updates will help it stay in good shape for lots of skating. If you want more tips and tricks about skateboarding, check out our next blog for exciting ideas and inspiration. Keep shredding!
FAQ
How long does it typically take to build a mini ramp?
Building a mini ramp can take a few days to a week. It all depends on how complex the design is, how skilled you are, and how much time you have. Simpler ramps might be finished more quickly.